14.9. セマンティックセグメンテーションとデータセット
14.3 章– 14.8 章 で物体検出タスクについて述べたときには、 画像中の物体をラベル付けして予測するために 矩形のバウンディングボックスを用いた。 この節では、画像を異なる意味クラスに属する領域へどのように分割するかに焦点を当てる セマンティックセグメンテーション の問題を扱いる。 物体検出とは異なり、セマンティックセグメンテーションは 画像中に何があるかをピクセルレベルで認識し理解する。 つまり、そのラベル付けと意味領域の予測は ピクセルレベルで行われる。 図 14.9.1 は、セマンティックセグメンテーションにおける 画像の犬、猫、背景のラベルを示している。 物体検出と比べると、 セマンティックセグメンテーションでラベル付けされる ピクセルレベルの境界は、明らかにより細かい粒度である。

図 14.9.1 セマンティックセグメンテーションにおける画像の犬、猫、背景のラベル。
14.9.1. 画像セグメンテーションとインスタンスセグメンテーション
セマンティックセグメンテーションに似た、コンピュータビジョン分野の重要なタスクとして、 画像セグメンテーションとインスタンスセグメンテーションもある。 以下では、これらをセマンティックセグメンテーションと簡単に区別する。
画像セグメンテーション は、画像をいくつかの構成領域に分割する。この種の問題の手法は通常、画像内のピクセル間の相関を利用する。学習時に画像ピクセルに関するラベル情報を必要とせず、予測時に得たい意味を持つ領域が分割されることを保証できない。 図 14.9.1 の画像を入力とすると、画像セグメンテーションは犬を2つの領域に分けるかもしれない。1つは主に黒い口と目を含む領域で、もう1つは主に黄色い残りの体を含む領域である。
インスタンスセグメンテーション は、同時検出とセグメンテーション とも呼ばれる。画像中の各物体インスタンスのピクセルレベルの領域をどのように認識するかを研究する。セマンティックセグメンテーションとは異なり、インスタンスセグメンテーションでは意味だけでなく、異なる物体インスタンスも区別する必要がある。たとえば、画像に2匹の犬がいる場合、インスタンスセグメンテーションでは、あるピクセルが2匹のうちどちらの犬に属するかを区別する必要がある。
14.9.2. Pascal VOC2012 セマンティックセグメンテーションデータセット
最も重要なセマンティックセグメンテーションデータセットの1つは Pascal VOC2012 である。 以下では、このデータセットを見ていきる。
%matplotlib inline
from d2l import torch as d2l
import torch
import torchvision
import os
%matplotlib inline
from d2l import mxnet as d2l
from mxnet import gluon, image, np, npx
import os

npx.set_np()
#@save
d2l.DATA_HUB['voc2012'] = (d2l.DATA_URL + 'VOCtrainval_11-May-2012.tar',
                           '4e443f8a2eca6b1dac8a6c57641b67dd40621a49')

voc_dir = d2l.download_extract('voc2012', 'VOCdevkit/VOC2012')
#@save
d2l.DATA_HUB['voc2012'] = (d2l.DATA_URL + 'VOCtrainval_11-May-2012.tar',
                           '4e443f8a2eca6b1dac8a6c57641b67dd40621a49')

voc_dir = d2l.download_extract('voc2012', 'VOCdevkit/VOC2012')
このデータセットの tar ファイルは約 2 GB あるため、
ダウンロードにはしばらく時間がかかるかもしれない。
展開後のデータセットは ../data/VOCdevkit/VOC2012 にある。
#@save
d2l.DATA_HUB['voc2012'] = (d2l.DATA_URL + 'VOCtrainval_11-May-2012.tar',
                           '4e443f8a2eca6b1dac8a6c57641b67dd40621a49')

voc_dir = d2l.download_extract('voc2012', 'VOCdevkit/VOC2012')
#@save
d2l.DATA_HUB['voc2012'] = (d2l.DATA_URL + 'VOCtrainval_11-May-2012.tar',
                           '4e443f8a2eca6b1dac8a6c57641b67dd40621a49')

voc_dir = d2l.download_extract('voc2012', 'VOCdevkit/VOC2012')
Downloading ../data/VOCtrainval_11-May-2012.tar from http://d2l-data.s3-accelerate.amazonaws.com/VOCtrainval_11-May-2012.tar...
#@save
VOC_COLORMAP = [[0, 0, 0], [128, 0, 0], [0, 128, 0], [128, 128, 0],
                [0, 0, 128], [128, 0, 128], [0, 128, 128], [128, 128, 128],
                [64, 0, 0], [192, 0, 0], [64, 128, 0], [192, 128, 0],
                [64, 0, 128], [192, 0, 128], [64, 128, 128], [192, 128, 128],
                [0, 64, 0], [128, 64, 0], [0, 192, 0], [128, 192, 0],
                [0, 64, 128]]

#@save
VOC_CLASSES = ['background', 'aeroplane', 'bicycle', 'bird', 'boat',
               'bottle', 'bus', 'car', 'cat', 'chair', 'cow',
               'diningtable', 'dog', 'horse', 'motorbike', 'person',
               'potted plant', 'sheep', 'sofa', 'train', 'tv/monitor']
#@save
VOC_COLORMAP = [[0, 0, 0], [128, 0, 0], [0, 128, 0], [128, 128, 0],
                [0, 0, 128], [128, 0, 128], [0, 128, 128], [128, 128, 128],
                [64, 0, 0], [192, 0, 0], [64, 128, 0], [192, 128, 0],
                [64, 0, 128], [192, 0, 128], [64, 128, 128], [192, 128, 128],
                [0, 64, 0], [128, 64, 0], [0, 192, 0], [128, 192, 0],
                [0, 64, 128]]

#@save
VOC_CLASSES = ['background', 'aeroplane', 'bicycle', 'bird', 'boat',
               'bottle', 'bus', 'car', 'cat', 'chair', 'cow',
               'diningtable', 'dog', 'horse', 'motorbike', 'person',
               'potted plant', 'sheep', 'sofa', 'train', 'tv/monitor']
../data/VOCdevkit/VOC2012 に入ると、
データセットのさまざまな構成要素を確認できる。
ImageSets/Segmentation
パスには、学習サンプルとテストサンプルを指定するテキストファイルが含まれ、
JPEGImages と SegmentationClass
パスには、それぞれ各例の入力画像とラベルが保存されている。
ここでのラベルも画像形式であり、
ラベル付けされた入力画像と同じサイズである。 さらに、
任意のラベル画像において同じ色のピクセルは同じ意味クラスに属する。
以下では、read_voc_images
関数を定義して、すべての入力画像とラベルをメモリに読み込みます。
#@save
def read_voc_images(voc_dir, is_train=True):
    """Read all VOC feature and label images."""
    txt_fname = os.path.join(voc_dir, 'ImageSets', 'Segmentation',
                             'train.txt' if is_train else 'val.txt')
    mode = torchvision.io.image.ImageReadMode.RGB
    with open(txt_fname, 'r') as f:
        images = f.read().split()
    features, labels = [], []
    for i, fname in enumerate(images):
        features.append(torchvision.io.read_image(os.path.join(
            voc_dir, 'JPEGImages', f'{fname}.jpg')))
        labels.append(torchvision.io.read_image(os.path.join(
            voc_dir, 'SegmentationClass' ,f'{fname}.png'), mode))
    return features, labels

train_features, train_labels = read_voc_images(voc_dir, True)
#@save
def read_voc_images(voc_dir, is_train=True):
    """Read all VOC feature and label images."""
    txt_fname = os.path.join(voc_dir, 'ImageSets', 'Segmentation',
                             'train.txt' if is_train else 'val.txt')
    with open(txt_fname, 'r') as f:
        images = f.read().split()
    features, labels = [], []
    for i, fname in enumerate(images):
        features.append(image.imread(os.path.join(
            voc_dir, 'JPEGImages', f'{fname}.jpg')))
        labels.append(image.imread(os.path.join(
            voc_dir, 'SegmentationClass', f'{fname}.png')))
    return features, labels

train_features, train_labels = read_voc_images(voc_dir, True)
[07:02:12] ../src/storage/storage.cc:196: Using Pooled (Naive) StorageManager for CPU
y = voc_label_indices(train_labels[0], voc_colormap2label())
y[105:115, 130:140], VOC_CLASSES[1]
y = voc_label_indices(train_labels[0], voc_colormap2label())
y[105:115, 130:140], VOC_CLASSES[1]
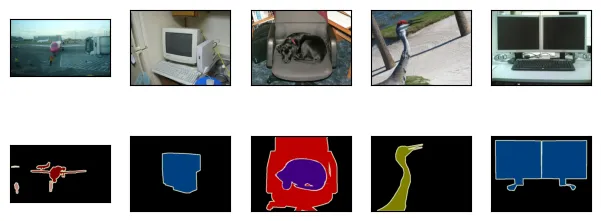
最初の5つの入力画像とそのラベルを描画する。 ラベル画像では、白と黒がそれぞれ境界と背景を表し、その他の色は異なるクラスに対応する。
n = 5
imgs = train_features[:n] + train_labels[:n]
imgs = [img.permute(1,2,0) for img in imgs]
d2l.show_images(imgs, 2, n);
n = 5
imgs = train_features[:n] + train_labels[:n]
d2l.show_images(imgs, 2, n);

crop_size = (320, 480)
voc_train = VOCSegDataset(True, crop_size, voc_dir)
voc_test = VOCSegDataset(False, crop_size, voc_dir)
crop_size = (320, 480)
voc_train = VOCSegDataset(True, crop_size, voc_dir)
voc_test = VOCSegDataset(False, crop_size, voc_dir)
次に、このデータセットのすべてのラベルについて、 RGB の色値とクラス名を列挙する。
#@save
VOC_COLORMAP = [[0, 0, 0], [128, 0, 0], [0, 128, 0], [128, 128, 0],
                [0, 0, 128], [128, 0, 128], [0, 128, 128], [128, 128, 128],
                [64, 0, 0], [192, 0, 0], [64, 128, 0], [192, 128, 0],
                [64, 0, 128], [192, 0, 128], [64, 128, 128], [192, 128, 128],
                [0, 64, 0], [128, 64, 0], [0, 192, 0], [128, 192, 0],
                [0, 64, 128]]

#@save
VOC_CLASSES = ['background', 'aeroplane', 'bicycle', 'bird', 'boat',
               'bottle', 'bus', 'car', 'cat', 'chair', 'cow',
               'diningtable', 'dog', 'horse', 'motorbike', 'person',
               'potted plant', 'sheep', 'sofa', 'train', 'tv/monitor']
上で定義した2つの定数を使うと、
ラベル内の各ピクセルのクラスインデックスを簡単に求めることができる。
voc_colormap2label 関数を定義して、 上記の RGB
色値からクラスインデックスへの対応を構築し、 voc_label_indices
関数を定義して、 この Pascal VOC2012 データセットにおける任意の RGB
値をそのクラスインデックスに対応付ける。
#@save
def voc_colormap2label():
    """Build the mapping from RGB to class indices for VOC labels."""
    colormap2label = torch.zeros(256 ** 3, dtype=torch.long)
    for i, colormap in enumerate(VOC_COLORMAP):
        colormap2label[
            (colormap[0] * 256 + colormap[1]) * 256 + colormap[2]] = i
    return colormap2label

#@save
def voc_label_indices(colormap, colormap2label):
    """Map any RGB values in VOC labels to their class indices."""
    colormap = colormap.permute(1, 2, 0).numpy().astype('int32')
    idx = ((colormap[:, :, 0] * 256 + colormap[:, :, 1]) * 256
           + colormap[:, :, 2])
    return colormap2label[idx]
#@save
def voc_colormap2label():
    """Build the mapping from RGB to class indices for VOC labels."""
    colormap2label = np.zeros(256 ** 3)
    for i, colormap in enumerate(VOC_COLORMAP):
        colormap2label[
            (colormap[0] * 256 + colormap[1]) * 256 + colormap[2]] = i
    return colormap2label

#@save
def voc_label_indices(colormap, colormap2label):
    """Map any RGB values in VOC labels to their class indices."""
    colormap = colormap.astype(np.int32)
    idx = ((colormap[:, :, 0] * 256 + colormap[:, :, 1]) * 256
           + colormap[:, :, 2])
    return colormap2label[idx]
たとえば、最初の例画像では、 飛行機の前方部分のクラスインデックスは 1 であり、 背景のインデックスは 0 である。
y = voc_label_indices(train_labels[0], voc_colormap2label())
y[105:115, 130:140], VOC_CLASSES[1]
(tensor([[0, 0, 0, 0, 0, 0, 0, 0, 0, 1],
         [0, 0, 0, 0, 0, 0, 0, 1, 1, 1],
         [0, 0, 0, 0, 0, 0, 1, 1, 1, 1],
         [0, 0, 0, 0, 0, 1, 1, 1, 1, 1],
         [0, 0, 0, 0, 0, 1, 1, 1, 1, 1],
         [0, 0, 0, 0, 1, 1, 1, 1, 1, 1],
         [0, 0, 0, 0, 0, 1, 1, 1, 1, 1],
         [0, 0, 0, 0, 0, 1, 1, 1, 1, 1],
         [0, 0, 0, 0, 0, 0, 1, 1, 1, 1],
         [0, 0, 0, 0, 0, 0, 0, 0, 1, 1]]),
 'aeroplane')
14.9.2.1. データ前処理
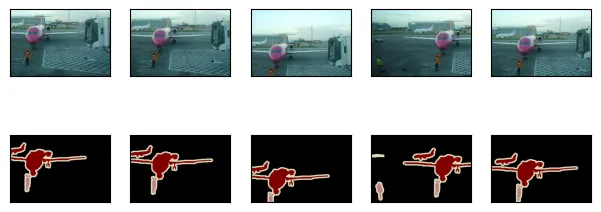
8.1 章– 8.4 章 などの以前の実験では、 画像はモデルが要求する入力形状に合わせるためにリサイズされていた。 しかし、セマンティックセグメンテーションでは、 これを行うと 予測されたピクセルクラスを元の入力画像の形状に戻す必要がある。 このようなリサイズは、特に異なるクラスを含むセグメント領域では不正確になりえる。 この問題を避けるために、 リサイズの代わりに画像を 固定 形状にクロップする。具体的には、画像拡張としてランダムクロップを用いて、入力画像とラベルの同じ領域を切り出す。
#@save
def voc_rand_crop(feature, label, height, width):
    """Randomly crop both feature and label images."""
    rect = torchvision.transforms.RandomCrop.get_params(
        feature, (height, width))
    feature = torchvision.transforms.functional.crop(feature, *rect)
    label = torchvision.transforms.functional.crop(label, *rect)
    return feature, label
#@save
def voc_rand_crop(feature, label, height, width):
    """Randomly crop both feature and label images."""
    feature, rect = image.random_crop(feature, (width, height))
    label = image.fixed_crop(label, *rect)
    return feature, label
imgs = []
for _ in range(n):
    imgs += voc_rand_crop(train_features[0], train_labels[0], 200, 300)

imgs = [img.permute(1, 2, 0) for img in imgs]
d2l.show_images(imgs[::2] + imgs[1::2], 2, n);
imgs = []
for _ in range(n):
    imgs += voc_rand_crop(train_features[0], train_labels[0], 200, 300)
d2l.show_images(imgs[::2] + imgs[1::2], 2, n);

14.9.2.2. カスタムセマンティックセグメンテーションデータセットクラス
高水準 API が提供する Dataset クラスを継承して、
カスタムのセマンティックセグメンテーションデータセットクラス
VOCSegDataset を定義する。 __getitem__ 関数を実装することで、
データセット内で idx によってインデックス付けされた入力画像と、
この画像の各ピクセルのクラスインデックスに任意にアクセスできる。
データセット内の一部の画像は
ランダムクロップの出力サイズよりも小さいため、 これらの例はカスタムの
filter 関数によって 除外される。 さらに、 入力画像の3つの RGB
チャンネルの値を標準化するために normalize_image 関数も定義する。
#@save
class VOCSegDataset(torch.utils.data.Dataset):
    """A customized dataset to load the VOC dataset."""

    def __init__(self, is_train, crop_size, voc_dir):
        self.transform = torchvision.transforms.Normalize(
            mean=[0.485, 0.456, 0.406], std=[0.229, 0.224, 0.225])
        self.crop_size = crop_size
        features, labels = read_voc_images(voc_dir, is_train=is_train)
        self.features = [self.normalize_image(feature)
                         for feature in self.filter(features)]
        self.labels = self.filter(labels)
        self.colormap2label = voc_colormap2label()
        print('read ' + str(len(self.features)) + ' examples')

    def normalize_image(self, img):
        return self.transform(img.float() / 255)

    def filter(self, imgs):
        return [img for img in imgs if (
            img.shape[1] >= self.crop_size[0] and
            img.shape[2] >= self.crop_size[1])]

    def __getitem__(self, idx):
        feature, label = voc_rand_crop(self.features[idx], self.labels[idx],
                                       *self.crop_size)
        return (feature, voc_label_indices(label, self.colormap2label))

    def __len__(self):
        return len(self.features)
#@save
class VOCSegDataset(gluon.data.Dataset):
    """A customized dataset to load the VOC dataset."""
    def __init__(self, is_train, crop_size, voc_dir):
        self.rgb_mean = np.array([0.485, 0.456, 0.406])
        self.rgb_std = np.array([0.229, 0.224, 0.225])
        self.crop_size = crop_size
        features, labels = read_voc_images(voc_dir, is_train=is_train)
        self.features = [self.normalize_image(feature)
                         for feature in self.filter(features)]
        self.labels = self.filter(labels)
        self.colormap2label = voc_colormap2label()
        print('read ' + str(len(self.features)) + ' examples')

    def normalize_image(self, img):
        return (img.astype('float32') / 255 - self.rgb_mean) / self.rgb_std

    def filter(self, imgs):
        return [img for img in imgs if (
            img.shape[0] >= self.crop_size[0] and
            img.shape[1] >= self.crop_size[1])]

    def __getitem__(self, idx):
        feature, label = voc_rand_crop(self.features[idx], self.labels[idx],
                                       *self.crop_size)
        return (feature.transpose(2, 0, 1),
                voc_label_indices(label, self.colormap2label))

    def __len__(self):
        return len(self.features)
14.9.2.3. データセットの読み込み
カスタム VOCSegDataset クラスを用いて、
学習セットとテストセットのインスタンスをそれぞれ作成する。
ランダムクロップ後の出力形状を \(320\times 480\) と指定するとする。
以下では、学習セットとテストセットに保持される例の数を確認できる。
crop_size = (320, 480)
voc_train = VOCSegDataset(True, crop_size, voc_dir)
voc_test = VOCSegDataset(False, crop_size, voc_dir)
read 1114 examples
read 1078 examples
バッチサイズを 64 に設定し、 学習セットのデータイテレータを定義する。 最初のミニバッチの形状を出力してみよう。 画像分類や物体検出とは異なり、ここでのラベルは3次元テンソルである。
batch_size = 64
train_iter = torch.utils.data.DataLoader(voc_train, batch_size, shuffle=True,
                                    drop_last=True,
                                    num_workers=d2l.get_dataloader_workers())
for X, Y in train_iter:
    print(X.shape)
    print(Y.shape)
    break
torch.Size([64, 3, 320, 480])
torch.Size([64, 320, 480])
batch_size = 64
train_iter = gluon.data.DataLoader(voc_train, batch_size, shuffle=True,
                                   last_batch='discard',
                                   num_workers=d2l.get_dataloader_workers())
for X, Y in train_iter:
    print(X.shape)
    print(Y.shape)
    break
(64, 3, 320, 480)
(64, 320, 480)
14.9.2.4. 全体をまとめる
最後に、Pascal VOC2012
セマンティックセグメンテーションデータセットをダウンロードして読み込むための
load_data_voc 関数を定義する。
学習データセットとテストデータセットの両方に対するデータイテレータを返す。
#@save
def load_data_voc(batch_size, crop_size):
    """Load the VOC semantic segmentation dataset."""
    voc_dir = d2l.download_extract('voc2012', os.path.join(
        'VOCdevkit', 'VOC2012'))
    num_workers = d2l.get_dataloader_workers()
    train_iter = torch.utils.data.DataLoader(
        VOCSegDataset(True, crop_size, voc_dir), batch_size,
        shuffle=True, drop_last=True, num_workers=num_workers)
    test_iter = torch.utils.data.DataLoader(
        VOCSegDataset(False, crop_size, voc_dir), batch_size,
        drop_last=True, num_workers=num_workers)
    return train_iter, test_iter
#@save
def load_data_voc(batch_size, crop_size):
    """Load the VOC semantic segmentation dataset."""
    voc_dir = d2l.download_extract('voc2012', os.path.join(
        'VOCdevkit', 'VOC2012'))
    num_workers = d2l.get_dataloader_workers()
    train_iter = gluon.data.DataLoader(
        VOCSegDataset(True, crop_size, voc_dir), batch_size,
        shuffle=True, last_batch='discard', num_workers=num_workers)
    test_iter = gluon.data.DataLoader(
        VOCSegDataset(False, crop_size, voc_dir), batch_size,
        last_batch='discard', num_workers=num_workers)
    return train_iter, test_iter
14.9.3. まとめ
セマンティックセグメンテーションは、画像を異なる意味クラスに属する領域へ分割することで、画像中に何があるかをピクセルレベルで認識し理解する。
最も重要なセマンティックセグメンテーションデータセットの1つは Pascal VOC2012 である。
セマンティックセグメンテーションでは、入力画像とラベルがピクセル単位で1対1に対応するため、入力画像はリサイズではなく、固定形状にランダムクロップされる。
14.9.4. 演習
セマンティックセグメンテーションは、自動運転車や医用画像診断にどのように応用できるか? 他の応用例も考えられますか?
14.1 章 のデータ拡張の説明を思い出そう。画像分類で用いられる画像拡張手法のうち、セマンティックセグメンテーションには適用できないものはどれだろうか。